The Ultimate Backpacking Guide for Boulder Pass Trail in Glacier National Park

Glacier National Park is often touted as one of the best places in the whole USA when it comes to hiking and backpacking, natural scenery and wildlife encounters. With tons of trails to choose from (over 700 miles at last count), it can obviously be tough to decide where exactly you want to explore.
While you will likely see guides and trail reports on such popular hikes as Avalanche Lake, Grinnell Glacier and the Highline Trail, we instead want you to consider adventuring on a bit more off-the-beaten-path trail. In this case — the Boulder Pass Trail, which takes you from the banks of Kintla Lake to the top of a glacier-serrated valley right on the doorsteps of the Canadian Rockies.
Below is our ultimate adventure guide to backpacking the beautiful Boulder Pass Trail.

WHAT TO KNOW ABOUT HIKING AND BACKPACKING IN GLACIER NATIONAL PARK
In our opinion, one of the best times to backpack in Glacier National Park is late summer and early fall. This is when there are fewer people, fewer bugs and a higher chance of seeing colorful fall foliage — including the golden larches. If you are planning to backpack in Glacier National Park then you will want to be aware of a few key things before hitting the trails — including important safety measures and how to secure your required backcountry permit.
SAFETY
Glacier National Park is home to a relatively large number of bears — including grizzly bears. While this shouldn’t be a cause for concern — and definitely not something to deter you from heading out onto the trails — we do recommend being prepared just in case you do run into a larger carnivore. One of the best ways to stay safe while hiking and backpacking in Glacier National Park are to always carry bear spray with you. Luckily, you can easily purchase (or rent) a can of bear spray in most outdoor stores near the national park. It is best to have the bear spray on your person at all times and to put it somewhere that you can easily grab it in case of an emergency. Other important safety tips to remember are to try to not hike alone and to focus on making plenty of noise — especially around blind corners.
Likewise, you will want to also bring a stuff sack and paracord/rope when backpacking so you can easily hang all of your food and smelly items once you get to camp. Storing ALL smelly stuff is key to deterring bears from entering your camp (it also helps keep little rodents out of your stuff as well). Finally, you will want to bring all of the necessary safety items with you on a trail: a headlamp, extra batteries, some form of a map, a first-aid kit and plenty of food.
➳ Learn more about hiking and backpacking in bear country in our handy safety guide!
BACKCOUNTRY PERMITS
If you are planning to backpack in Glacier National Park then you will need to first secure a backcountry permit. You can get your permit at 5 spots within the national park: the Apgar Backcountry Permit Center, the St. Mary Visitor Center, the Many Glacier Ranger Station, the Two Medicine Ranger Station and the Polebridge Ranger Station.
❔ GOOD TO KNOW: not all of these permitting offices are open year-round. Most do close near the end of September (Polebridge closes early September).
There is a $7 /night camping fee (per person) that will need need to be paid upon receiving your permit. Though if you are planning to camp outside of the summer or fall — November to late April — then the camping fee is waived.
➳ Learn more about reserving your backcountry permit here.

\\ How to Get to the Boulder Pass Trailhead
The Boulder Pass Trailhead — though located in Glacier National Park — is in a relatively rugged and remote location. The national park is quite large (over 1 million acres) and there are a lot of places to see and explore. The Boulder Pass Trailhead is situated in the North Fork section of the park, which is in the far northwest corner (there are 7 sections in total).
Below is a basic outline of how to reach the trailhead from the major towns near the park.
DRIVING
From Columbia Falls (Whitefish and Kalispell): from Columbia Falls it takes roughly 1.5 hours to reach the trailhead for Boulder Pass. To start, drive out on Road 486/North Fork Road until you reach the intersection of Camas Road (turning right here will take you to West Glacier). Keep driving up North Fork Road as it goes in and out of being paved and dirt. About 35 miles from Columbia Falls you will get to the small town of Polebridge (you will need to turn right off of North Fork Road and onto Glacier Drive — there will be a sign). Here there is an amazing bakery and store as well as a small hostel and a saloon (definitely stop in at the store for their huckleberry bearclaws).
Once you leave Polebridge, you will drive a bit further down the dirt road before you actually enter the national park at the Polebridge Ranger Station. If the ranger station and entrance station are open, you will need to show either your America the Beautiful National Park Pass or pay the $35 entrance fee. From the ranger station it is just over 14 miles to the Boulder Pass Trailhead, BUT this is on a rougher dirt road so expect this to take between 30–45 minutes. Also, this road is not plowed and does close in the winter.
>> Total Distance // Time | 51 miles // 1 hour and 35 minutes
❔ GOOD TO KNOW: if you are starting your drive from Kalispell then add on an extra half hour and 18 miles or so to the total time/distance. Likewise, if you are leaving from Whitefish, then add on extra 20 minutes of driving and 10 miles. Both routes will head through Columbia Falls and follow the same directions as above.
From West Glacier and Apgar Village: if you are starting your journey north from West Glacier or Apgar Village (where the Apgar Visitor Center is located) then you will need to drive out on Camas Road for roughly 14 miles until you reach the intersection with North Fork Road. Once you reach that dirt/paved road, you will turn right and keep driving all the way to Polebridge and then on to the Kintla Lake Campground and the Boulder Pass Trailhead.
>> Total Distance // Time | 43 miles // 1 hour and 26 minutes

PUBLIC TRANSPORTATION
While there is a park shuttle within Glacier National Park, the route only follows the Going to the Sun Road. Because of Boulder Pass’s more remote location (i.e. it’s in the far northwest corner of the very large national park) you will have to drive there yourself.
\\ The Best Time to Hike to Boulder Pass
While this backcountry trail is likely beautiful in the late spring and summer, we instead suggest doing it during the fall — especially when the larch trees start to change colors. By doing this hike later in the season, you cut down on the likelihood of having to deal with a lot of people (and the challenge of getting a backcountry camping permit for Boulder Pass) and also you decrease the chance of struggling with a lot of bugs — especially mosquitos.
But furthermore, by hiking up to Boulder Pass in the fall, you increase your chance of a) having some absolutely stunning mountain views, b) walking through golden larch forests and bright red huckleberry meadows, and c) seeing large, fat bears right before they head into hibernate for the winter.
We did this trail in mid-October and while the nights and early mornings were chilly, by mid-morning the sun was up and the weather was perfect. As long as you are fine carrying a few extra layers of clothing and maybe packing a cold-weather tent (we brought our 4-season tent) you shouldn’t have a problem with the chillier weather.


\\ What to Bring With You to Hike Boulder Pass
If you plan to do the Boulder Pass Trail later in the season as we did, then you will want to make sure you are packing the right outdoor gear. Due to Montana’s fickle weather and this trail's higher elevation, you will definitely want to make sure you are packing plenty of warm clothes and hardier camping gear.
Below you will find a few key things you will want to have in your backpack — plus our own honest gear reviews.
BEAR SPRAY
This safety item is pretty much necessary for all hikes within Glacier National Park. But for this backpacking trip especially you will want to make sure you keep a bottle of bear spray on you at all times — even when heading off into the woods to use the bathroom. We suggest securing your bear spray in a way that makes it comfortable while hiking and also is keeps within easy reach in case you do need to use it. | Our Top Choice
4-SEASON TENT
While 4-season tents are known to be quite bulky — especially when compared to their 3-season counterparts, we believe the extra weight is worth it if it means you get a nice warm nights sleep. This tent by Black Diamond is big enough for 2 people and is meant to be used for mountaineering (meaning it actually packs down quite tightly). | Our Top Choice
SLEEPING PAD
This bright yellow Therm-a-Rest sleeping pad is ultralight and specifically designed for backpackers who really care about how much stuff they carry while on the trail. While its lightness is a big plus, what we think sets it apart (and makes it perfect for this late-season adventure) is its ThermaCapture lining, which is meant to reflect your body heat back to you — aka you will stay warmer even on those chilly late season backcountry trips. | Our Top Choice
FOLDABLE SLEEPING PAD (FOR COOKING)
While you will definitely want a super comfortable and warm sleeping pad for actual sleeping, you might also want to consider packing a lightweight pad for when you are cooking (you will have to cook in a designated spot due to bears). This foldable pad by Exped is easy to pack and even easier to use. Plus, it will help keep your butt warm when making that morning cup of joe. Score. | Our Top Choice
FOOD STUFF BAG
Another helpful (and completely necessary) item you will need with you when backpacking in bear country (like Boulder Pass) is a durable stuff sack that can easily hold all of your food and smelly stuff. The main point with this bag is to store everything that could attract a bear inside the bag and then tie it up with rope and hang it from a designated bear hang, tree or bar (this is likely the most important safety tip while camping in bear country). This 15L stuff bag by Outdoor Research is what we used and we have nothing but good things to say about it. | Our Top Choice


PARACORD FOR HANGING FOOD
The final piece in your bear-safety arsenal is a lightweight piece of paracord. This 32-foot long one by MSR will easily be long and strong enough to use when hanging up all of your food at camp. | Our Top Choice
JETBOIL AND POT
Nothing is more annoying when you are camping than having to wait forever for water to boil (this is even more true after an extra long day on the trail). Luckily, Jetboil stoves are super fast at boiling water — meaning you will be chowing down on that backpacking meal in no time. This easy-to-pack Jetboil stove can hold 2.5 cups of water.| Our Top Choice
COOKING UTENSILS
While you can usually get away with just a simple bowl and spork (spoon and fork utensil), if you are looking for a full backcountry camping food setup then consider investing in this set by GSI Outdoors. It comes with a plate, bowl (and lid), an insulated mug, a simple cup and all three major utensils. | Our Top Choice
WATER FILTER
We have become strong believers in just packing a water filter and a few water bottles when hiking and backpacking — at least when we know there is an ample amount of water available (like there is on the Boulder Pass Trail). We have been using this Katadyn water filter for years and are still loving it. | Our Top Choice
WINDBREAKER
If you are planning to backpack during the fall, then you will definitely want to make sure to pack plenty of warm clothes — especially something to help you deal with the cold wind that often blows through in the fall. This windbreaker by Cotapaxi comes in a number of fun colors, is very breathable, is easy to pack down and carry when not needed, and has a handy front pocket that can store those small items you always seem to reach for on the trail (mainly snacks). | Our Top Choice
MITTENS
Another handy item to have with you when backpacking along the Boulder Pass Trail — especially during the fall — is a super cozy pair of mittens or gloves. We especially like this pair by Outdoor Research because they are warm enough to keep your hands cozy on those chilly early mornings, but are not bulky enough to take up too much space in your backpack. | Our Top Choice

BINOCULARS
The final item you should consider packing in your backpack for the Boulder Pass Trail is a set of binoculars. While this is definitely not a “need to have” item, it is one of those things that is seriously fun to have — especially in the fall when you want a better chance of spotting bears. This set by Nocs Provisions is pretty light and has good tech specs (it is a 10x25). | Our Top Choice
BACKPACKING TO BOULDER PASS | THE ADVENTURE BREAKDOWN
TOTAL DISTANCE: 17.5 miles one-way, so around 35 miles total
ELEVATION PROFILE: just over 3,000 feet gained
TIME NEEDED: 2–4 days
TRAIL CONDITIONS: easy to follow singletrack trail, is mostly flat from Kintla Lake to the end of Upper Kintla Lake (distance: ~11 miles), then starts to gain elevation up to the pass; lots of larch trees and huckleberry bushes, bit overgrown in places, stunning views of the Agassiz Glacier, water is easily available.
START | The Boulder Pass Trail begins at the Boulder Pass Trailhead which is located at the very end of Inside North Fork Road. Right after the trailhead is the Kintla Lake Campground, which is open until October 31st (though services, like water, close on September 12th). This very remote front-country campground offers campsites, a ranger station, water and bathrooms.
1 | From the trailhead, the singletrack trail starts out quite flat and wooded. About half a mile in you will get to a T in the trail. If you go right you will reach the campground, if you go left you will continue on the Boulder Pass Trail, which follows the banks of Kintla Lake for around 6 miles. Go left.

2 | After 6 forested miles, you will reach the first campground along the trail: Kintla Lake Head Campground. This campground has a really nice spot to make lunch, filter water and go to the bathroom. On our hike out, this is where we stopped to have lunch.
3 | From the first campground, it is around 5 miles to the beginning of Upper Kintla Lake (again, mostly through pine and larch forest). Right before you leave the large Kintla Lake behind you will see a wooden cabin and a small hitching post. From the cabin, you will enter the dense forest once again.
Between the two lakes, you will pass through a large grove of larch trees — that, if you time it right in the year (early October), will be a beautiful shade of gold. This part of the hike was one of our favorites — especially since you also are given some incredible views of the surrounding peaks (including Kinnerly Peak).
After the larch forest, you will spit out into a large open meadow with a rumbling waterfall on the left side. This is a great spot for wildlife spotting — especially grizzly bears.
4 | Upper Kintla Lake is another super pretty crystal clear lake. It is home to bull trout, which are protected. Therefore you are not allowed to fish on Upper Kintla Lake (you are allowed to on the larger Kintla Lake). At the end of Upper Kintla Lake, you will see the second campground (also named Upper Kintla Lake). Here is a great spot to take a rest, filter water, eat a snack and use the bathroom before you start the long climb up to the pass.
❔ GOOD TO KNOW: this is also a fantastic place to cool off after the long, 11-mile hike — which, more than likely, left you a bit sweaty.
5 | Once you leave the bank of Upper Kintla Lake, you will quickly start the climb up to the pass. While there really aren’t too many parts of the trail that are super steep — only a couple of sections near the top — it is a steady climb for over 6 miles.
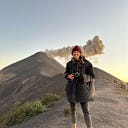
The beginning of this section is through dense pine and larch trees. You will also need to cross a sizeable wooden suspension bridge, which traverses the Kintla River. From the river, you will begin a steady climb higher up the mountainside. Soon enough the dense trees will fall away and you will be out in a more meadow-y landscape. From there, you will have amazing views of the Agassiz Glacier across the valley as well as a sizeable waterfall that tumbles down the mountainside.

6 | Keep hiking up the mountainside — including up a few switchbacks — until you start to cross multiple small streams in quick succession. From this point on the trail, you are within two miles of the top of the pass (you got this!).
Soon enough, you will see a clear flat ridge right above the trail. This is the last section before you top out on Boulder Pass.
7 | Once the trail begins to flatten out, you will see a large rocky slab in front of you and the large looming Gardner Point (7,359 feet) behind that. Right in front of that mountain is a small copse of pine trees — this is the campground. There will be a metal sign pointing you towards the campground, as well as numerous large rock cairns outlining the way to go. Cross the rock slab and a small gurgling stream (your water source at camp) for about another 5 minutes until you reach the campground. You made it!
BOULDER PASS CAMPGROUND
This super scenic backcountry campground might be one of the best in all of Glacier National Park. It has 3 very flat (and soft) tent sites, a food prep area that is guarded against the wind by tall pine trees, and a pit toilet that might just have one of the best views in the whole Rocky Mountains (everyone raved about this toilet beforehand and it did not disappoint).
We spent two nights at the campground and absolutely loved it. The sunrises and sunsets were magical, as were the stars and view of the Milky Way.


MAKE IT A LOOP
If you don’t want to do an out-and-back backpacking trip, then you have the option to hike out from Boulder Pass towards Brown Pass (7.9 miles away). From the top of Brown Pass, you will descend a few thousand feet in elevation until you reach the Bowman River in the forested valley below. Once you reach the river, you will continue hiking down toward the very large Bowman Lake. Altogether, this loop is around 39 miles long. Do note that you will need a shuttle for this option.
💬 INSIDER TIP: we originally planned on doing the whole loop, but after factoring in the amount of driving it would take between the trailheads, we decided to just do an out and back (plus our real goal was to see Boulder Pass and Hole in the Wall). If you decide to do the whole loop, you can camp at Hole in the Wall, Brown Pass (though most people say this isn’t a great spot), and the head of Bowman Lake.
HEAD UP TO HOLE IN THE WALL
One of the main reasons we chose this backpacking route in particular was the chance to see this incredible mountain destination. To reach Hole-in-the-Wall, just keep hiking along the Boulder Pass Trail for another 6.3 miles or so. Along the way, you will cross over a very cool glacier field (where there are two mesmerizing alpine lakes) before you see a sizeable round valley down below. You will circumvent the whole bowl, before heading down a singletrack trail into the actual stunning Hole-in-the-Wall valley.
There is a backcountry campground here, but make sure to check if it is open (sometimes it closes for environmental reasons). Also, be aware that this is a common place to see bears — grizzly and black bears — so never wander off without your bear spray and keep all food/smelly stuff close by.
We spent an afternoon exploring this area and absolutely loved it. The pine forest, mountain views and numerous waterfalls make it feel like an alpine oasis. Highly recommend!


CONTINUE ON TO GOAT HAUNT
You can also simply keep heading along the Boulder Pass Trail until it reaches Brown Pass (where there is a campground) and then on to Goat Haunt, a specific section of the park. Once you reach the second pass, head to the left and continue hiking east along the Boulder Pass Trail. From Boulder Pass, it is around 13.2 miles to reach the heart of Goat Haunt and the Continental Divide Trail (or around 30 miles from the start of the Boulder Pass Trail). This is another great backpacking option — especially if you want to explore more massive peaks and mountain lakes.
Backpacking the Boulder Pass Trail gives you an incredible opportunity to explore a much less popular area of Glacier National Park. Plus, it is just absolutely beautiful: jagged mountain peaks, glowing white glaciers, dense larch forests, and crystal clear mountain lakes. Seriously, the whole time we were backpacking we couldn’t believe how stunning the whole area was.
We truly cannot recommend this backpacking trail enough. While we hope this adventure guide helps you plan the perfect backpacking trip yourself, if you have any further questions please feel free to leave them below or reach out to us directly.
Happy adventuring!